Category: Recipes

Recipe of the Month – Chicken Ramen

This recipe is probably my husband’s favorite dinner, and one of mine as well. It’s one of those meals that we have to force ourselves to stop eating when we’re full, because we want to keep chowing down on it! It’s a bit higher effort than most of my go-to dinners, but it’s still an easy and relatively quick meal.

Servings: 4
Prep Time: 30 minutes
Cook Time: 20 minutes
Total Time: 50 minutes

Ingredients:
2 boneless skinless chicken thighs
32 oz carton chicken broth
1 tbsp chicken bouillon or “Better Than Bouillon”
2 heads baby bok choy, rinsed thoroughly
½ cup shredded carrots
1 bunch green onion (scallions), rinsed thoroughly
2 eggs
Ramen noodles (thin Asian noodles), about 1/3 lb

Instructions:
Cut up the chicken first. Cut it into small chunks, about what would fit into a ¼ tsp measuring spoon. Place it in a large pot with the chicken broth and bouillon. Set it to medium-high with lid on, to boil.


While the broth is heating, cut up the baby bok choy and scallions. Use the green leafy part of the baby bok choy and a small amount of the white stem, and cut it into thin strips. Cut off the ends (both white and green ends) of scallions and peel away any dry outer skin before slicing it into thin circles.
Once the broth has started to boil, add the carrots, baby bok choy, and scallions. Reduce the heat to medium. Continue to cook, uncovered, for about 10 minutes.

Meanwhile, set a medium pot of water to boil. Cook the noodles following the package instructions. My preferred noodles take only about 2 minutes to cook. After the noodles are cooked, drain them and set them aside.

In a small bowl, crack eggs and scramble them with a fork. Then pour them into the soup, stirring immediately. Reduce the heat to low and cook for another 5 minutes.

Add the noodles to the soup, stir well, and serve. Delicious!

Recipe of the Month – Chicken Dumpling Stew

This recipe is for one of the most taste-bud-pleasing, comforting, and easy recipes in my cook book. It uses a lot of “cheat” ingredients, which is one reason it’s so easy. It also uses a slow cooker, which usually means a low-involvement dinner that basically cooks itself. What’s not to love?


Servings: about 6

Prep Time: 5 mins

Cook Time: 5 hrs


Ingredients:

4 skinless boneless chicken thighs

2 tbsp salted butter

1 can cream of mushroom soup (condensed, 10.5 oz)

1 can cream of chicken soup (condensed, 10.5 oz)

1/2 carton chicken broth (16 oz)

1 bag frozen mixed veggies (16 oz)

1 bag frozen diced onions (12 oz)

Seasoned salt

Pepper

Dry parsley (optional)

1 can biscuits


Instructions:

Place chicken thighs in slow cooker along with everything but the biscuits: butter, cream of mushroom soup, cream of chicken soup, chicken broth, mixed veggies, onions, salt, pepper, and parsley. Stir to mix somewhat – but it doesn’t have to be perfectly combined at this point. Cover and cook on high for 4 hours.

chicken-dumpling-stew-in-pot

Tear biscuits into small pieces and drop into stew. Continue to cook on high for 1 hour, or until chicken reaches internal temperature of 165 and biscuits are cooked through. Use two forks to tear chicken into smaller pieces. Serve and enjoy!

chicken-dumpling-stew-bowl

Notes:

The measurements for the ingredients are based on what was available at my grocery store. If you have a bag of mixed veggies or onions or canned ingredients that are slightly bigger or smaller, don’t worry about it, just toss it in. The stew will still be delicious!

Chicken thighs sometimes aren’t available as boneless and skinless. In that case, it will take a little bit more work to separate the skin and bones from the meat. You can carefully cut off the skin first, and then cut chunks of meat away from the bone, and toss them into the slow cooker just like that. Either way, don’t worry about cutting them up before cooking, because it’s super easy to shred those pieces after they’re cooked. Just probe around with two forks and tear up any big chunks you find, before serving.

Almost all of these ingredients can be purchased organic, or you can prepare them yourself if you prefer. Mixed veggies can be prepared with fresh produce by mixing peas, corn, chopped baby green beans, and thin chopped carrots. You can dice fresh onions. Even cream of chicken soup, cream of mushroom soup, and chicken broth can be made from scratch, if you prefer. And of course, buttermilk biscuits can be made by hand as well. I like to use shortcuts when possible, but you can make this recipe as “from scratch” as you’d like! Recipes for all of those things can be found easily online.

Recipe of the Month – Creamy Eggnog

rotm-creamy-eggnog
This recipe is for delicious, creamy eggnog–a perfect holiday treat! I created this recipe to fit my idea of a perfect eggnog. Three unique features of this recipe are that the eggs are cooked for safety, the whole eggs are used rather than just the yolks, and there is no alcohol included. These are my preferences, but the recipe can be adapted if yours are different! See the notes at the bottom for more details.

Servings: 8 cups (½ gallon)
Total Time: 35 minutes to prepare + 2 hours or so to cool

Ingredients:
6 eggs
6 cups half and half
3/4 cup sugar
Pinch of salt
1 tsp vanilla
1/2 tsp nutmeg
1/2 tsp cinnamon

Instructions:
Beat eggs with an immersion blender* or electric mixer until smooth and well combined. Add half and half, and blend well. Pour into a nonstick pot and heat over low, stirring frequently.

img_20161212_184803

Cook until the mixture reaches 160° F. Remove to a bowl, and add the sugar, salt, vanilla, nutmeg, and cinnamon. Beat together with an immersion blender* or electric mixer on medium high for 2 minutes, until everything is smoothly combined.

img_20161212_193704

Cover the bowl and put it in the fridge or freezer to cool completely. Once cooled, taste test, and add more sugar or spices to taste if desired. You can give it another whirl with the blender or mixer for extra smoothness. Pour into mason jars, a pitcher, or a punch bowl and refrigerate or serve immediately.

img_20161212_194039

Notes:

Most eggnog recipes call for using the yolks only, and using them raw. Or, you might find recipes that use beaten egg whites as a topping for the eggnog. I have tried those methods and found that I can’t tell the difference, taste-wise. And since I prefer to cook the eggs for safety, and I’d rather get more use from the eggs, I don’t separate them. I think this nog is pretty delicious despite being “non-traditional.” However, if you prefer to separate your eggs, you can do so. In that case, you might cook the yolks with the half and half, or just use them raw and skip the cooking step. The whites can be beaten to stiff peaks and folded in at the end, or left out entirely.

I use half and half because I think it’s easiest, and has a good creamy texture without being too heavy. An alternative option is to use 3 cups whipping cream and 3 cups whole milk, instead of the 6 cups half and half. Personally, heavy whipping cream tastes too “greasy” to me, which is why I prefer regular whipping cream, the slightly less fatty version. Ultimately, the goal is to get a mixture that is about half cream and half milk.

*I recommend using an immersion blender or a regular blender, rather than an electric mixer. The blades of a blender do a much better job of pulverizing any egg chunks that might be in there. Personally, I really dislike egg chunks in my eggnog. Blegh! In the picture you can see I was using an electric mixer, but later I had to use the immersion blender because I discovered some unwanted chunks during the taste test.

When you are cooking the eggs, cream, and milk, make sure to stir very frequently and keep a very close eye on it. The eggs can quickly start to solidify if it gets too hot or isn’t stirred enough. If this happens and you catch it right away, you can remove it from the heat immediately and blend the small amount of cooked egg back in. However, if you don’t catch it quick enough, you will have a big pot of fluffy scrambled egg. I may or may not know this from experience… and I may or may not have turned it into a quiche to avoid wasting it. That quiche may or may not have been delicious. 😉

img_20161212_202507
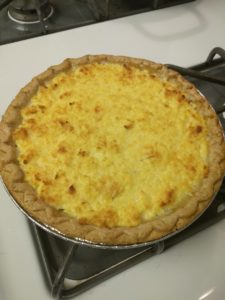
When life gives you ruined eggnog, you make a quiche.

If you’d like to add alcohol to your eggnog, you can take away some of the milk and cream to compensate. Try to keep the overall liquid content the same to avoid an overly thick or thin eggnog.

To avoid having your eggnog go bad, I’d recommend drinking it within the time you’d want to finish an opened carton of milk, about a week. Since the eggs are cooked, you don’t need to worry about using it up within a day or two. Although, let’s be honest, that might happen anyway!

Recipe of the Month – Chicken Coconut Curry

Welcome to my new recipe of the month! This is a new idea I’m trying, to share my love of cooking with the world. I hope you enjoy the recipes I post here, which are designed to be reasonably easy, quick, nutritionally balanced, and of course, delicious. If you try a recipe out, please leave comments on the post with your experience. I’d love to know how it worked out for you!

This recipe is for a tasty, easy dish that my family enjoys. We aren’t huge fans of Indian food, but we don’t hate it either. I think this meal would be enjoyed by lovers of Indian food and picky eaters alike, because it’s mild while still being flavorful.

Servings: 2 (double the recipe for more servings!)
Total Time: 30 minutes

Ingredients:
Chicken breast, 1 large or 2 medium
1 carrot
1 small bunch spring onions
3 tbsp curry paste
About ⅓ cup coconut milk (more for a creamier dish, less for a stronger curry flavor)
1 cup rice, uncooked
½ cup peas, fresh or frozen
Olive oil
Salt and pepper to taste
Fresh cilantro leaves, if desired

Notes:
I sometimes like to prep for the meals I plan to cook in the week, on the day I go grocery shopping if possible. Getting all of the chopping, marinating, and slow cooking processes (like steaming rice) out of the way all at once makes it super quick and easy to cook dinner every night.

The curry paste I use is found in my grocery store in the aisle with Asian foods, which is also where the coconut milk is. Curry paste can be found in varying degrees of spiciness and with different flavors added, too. I use mild, which has plenty of flavor for my family. The coconut milk I use for cooking comes in a small can, and is very creamy and delicious. This recipe doesn’t use the whole can, and the leftover can be saved and used for other recipes.

img_20161104_185907


I always take the temperature of meats when I’m cooking, because things like color, juices, or even the amount of time cooking aren’t always accurate or consistent ways of knowing when the meat is done. All it took was one case of food poisoning to convince us to adopt this practice! Food thermometers are not expensive, and it only takes a minute to check. You can download a free printable document with safe cooking temperatures for different types of meat here! It also has information on safe food handling practices in general.

Prep:
Cook the rice.
Cut the chicken breast into bite-size pieces.
Wash and cut the ends off of the carrot, then slice it into thin slices.
Wash and cut the ends from the top and bottom of the spring onion, then cut the green stalks into thin slices, and roughly dice the bulb part.

Cooking:
In a large pan, heat about a tablespoon of olive oil. Season the chicken with salt and pepper, then add it to the pan. Dump in the carrots and onion as well. Stir, cover, and cook for 2-3 minutes. Stir again, and cover. Covering the pan helps the food cook faster and the veggies become more tender.

img_20161104_190147


Add the curry paste and coconut milk* to the pan and stir it well to combine. Lower the heat, cover, and let it simmer for another few minutes.

*Coconut milk separates naturally, so if you’re not using an entire can, be sure to stir it first before measuring or scooping out the amount you’re going to use!

img_20161104_190831


(Indian food isn’t exactly photogenic, now is it? But I promise it tastes good!)


Meanwhile, heat the peas, then add the rice, stir, and heat until it’s all nice and warm.

img_20161104_191616


Check the temperature of the chicken with a food thermometer, to ensure it has reached at least 165 degrees Fahrenheit. Serve the rice with peas next to the chicken curry, and top with fresh, (washed), torn cilantro leaves, if so desired.

img_20161104_192525

Enjoy your dinner!