Category: Cooking

Recipe: Sticky Sweet Pork Belly Bowls & Ramen Noodle Soup

Hello readers! I have not posted for quite a while because I am pregnant and really feeling the discomfort of the first trimester. The nausea hits me hard and it stays for a long time. I’m 14 weeks along now and still not feeling any relief yet. It’s rough!

There have not been a ton of things I have been able to eat in the past couple of months, but this recipe was one that I enjoyed very much. With the coronavirus craziness and groceries being a bit harder to get, I decided to finally use the pork belly I’ve had in my deep freezer for way too long. I copied and modified some recipes I found online to create this one, and my experiment was a success! I hope you try this one and if you do, enjoy it!


Slow Cooker Sticky Sweet Pork Belly Bowls

& Savory Ramen Noodle Soup

Two Recipes in One!


Ingredients:

Pork belly meat (raw)

Chicken stock

Vegetable oil

Salt & pepper

Steamed white rice

For the glaze:

Honey

Brown sugar

Soy sauce

For the ramen:

Ramen noodles

Salt (or garlic salt)

Optional veggies: green onion, baby bok choy, peas, corn, small cubed carrots

Optional: egg


Instructions:

This recipe is easily scalable to whatever amount of ingredients you buy.

Begin by slicing the pork belly into thick strips, about two inches wide. The size is not as important as simply cutting the meat into similarly-sized pieces so that they cook evenly. Place the pieces of pork belly into the slow cooker pot and cover with chicken stock, just submerging the meat. Cook on low for about six hours.

Reserve the cooking liquid for ramen noodle soup broth; I recommend blending the broth in a blender or food processor to pulverize any chunks, which also results in a delicious miso-like texture.

Shred pork belly with forks, then fry in a pan with vegetable oil, salt, and pepper. Meanwhile, make the glaze by mixing equal parts honey, brown sugar, and soy sauce. Make enough to coat the meat well; roughly ¼ cup of each ingredient for up to 2 lbs of meat. When the meat begins to brown and look crispy, add the glaze and stir to coat well. Cook for another few minutes to allow the glaze to stick well on the meat.

Serve over steamed white rice. It pairs well with a side of edamame!

For the ramen noodle soup, simply reheat the broth if it has been cooled. Cook thin Asian noodles right in the broth, or cook in water and drain before adding to the broth. Add salt, or garlic salt, to taste. Optionally, add veggies such as green onions, thin slices of baby bok choy, peas, corn, or small cubed carrots, and boil in broth until tender before adding noodles. A raw scrambled egg can also be added to the boiling broth, stirring gently, for added flavor and texture.

Recipe of the Month – Instant Pot Chicken Fettuccine Alfredo

This meal is both easy and decadent. It does take a good amount of time, mostly because I cook my chicken from frozen (in the deep freezer), but it’s a fairly hands-off cooking process. It’s not something we cook more than once per month in my family, but reserve as a special treat because it is very high in fat. That being said, it is of course delicious and my new favorite meal, ever since I learned to make it last month. This month, I perfected the recipe and altered it to use my new favorite appliance, the Instant Pot. Now it’s even easier, and more delicious, and I just had to share it!

Servings: 4
Total Time: 45 minutes

Ingredients:
½ lb uncooked fettuccine pasta
2 large boneless, skinless chicken breasts
1 tsp Better Than Bouillon chicken base, or 1 cup chicken broth
1 clove garlic, minced or pressed (optional)
Salt and pepper, to taste
1 stick (8 tablespoons) unsalted butter
2 cups whipping cream
1 1/2 cups Italian blend of cheeses (such as parmesan, romano, and mozzarella)

Instructions:
Place chicken breasts directly in the inner cooking pot of the instant pot. Add chicken base with 1 cup water, or 1 cup of chicken broth. Add garlic for additional flavor, if desired. Hint: I’ve recently added a garlic press to my kitchen arsenal, and I can’t believe I didn’t buy one sooner. It makes adding garlic to my dishes SO much faster and easier.

Close the lid and move the vent to sealing, then cook on manual (high pressure) for 15 minutes, for deeply frozen chicken; 10 minutes for normally frozen chicken; or 8 minutes for fresh chicken. After cooking, allow pressure to release naturally for 15 minutes before opening. Check the temperature of the chicken, ensuring it has reached at least 165 degrees Fahrenheit. If necessary, cook for an additional 5 minutes and do a quick release.

While chicken is cooking, bring a large pot of water to a boil. Add the pasta, and cook according to package directions. Strain, and toss with butter. Hint: Take a small slice of butter from the stick you will be using for the sauce. Also, I recommend leaving the pasta in the strainer, so you can re-use the pot to cook the sauce.

In a large saucepan, melt the butter. Whisk in the cream and season with salt and pepper. Bring the sauce to a simmer, then cook for 2 minutes. Lower the heat, and whisk in the cheese. Don’t worry if sauce seems thin while it’s cooking. It will thicken by the end!

After the chicken has cooked, cut it into bite-sized pieces.

Add the chicken and cooked pasta to the sauce, and mix well before serving. Hint: a pasta ladle is extremely useful for this.

Serve with steamed green beans or a fresh salad to complete the meal, and enjoy!

Recipe of the Month – Chicken Dumpling Stew

This recipe is for one of the most taste-bud-pleasing, comforting, and easy recipes in my cook book. It uses a lot of “cheat” ingredients, which is one reason it’s so easy. It also uses a slow cooker, which usually means a low-involvement dinner that basically cooks itself. What’s not to love?


Servings: about 6

Prep Time: 5 mins

Cook Time: 5 hrs


Ingredients:

4 skinless boneless chicken thighs

2 tbsp salted butter

1 can cream of mushroom soup (condensed, 10.5 oz)

1 can cream of chicken soup (condensed, 10.5 oz)

1/2 carton chicken broth (16 oz)

1 bag frozen mixed veggies (16 oz)

1 bag frozen diced onions (12 oz)

Seasoned salt

Pepper

Dry parsley (optional)

1 can biscuits


Instructions:

Place chicken thighs in slow cooker along with everything but the biscuits: butter, cream of mushroom soup, cream of chicken soup, chicken broth, mixed veggies, onions, salt, pepper, and parsley. Stir to mix somewhat – but it doesn’t have to be perfectly combined at this point. Cover and cook on high for 4 hours.

chicken-dumpling-stew-in-pot

Tear biscuits into small pieces and drop into stew. Continue to cook on high for 1 hour, or until chicken reaches internal temperature of 165 and biscuits are cooked through. Use two forks to tear chicken into smaller pieces. Serve and enjoy!

chicken-dumpling-stew-bowl

Notes:

The measurements for the ingredients are based on what was available at my grocery store. If you have a bag of mixed veggies or onions or canned ingredients that are slightly bigger or smaller, don’t worry about it, just toss it in. The stew will still be delicious!

Chicken thighs sometimes aren’t available as boneless and skinless. In that case, it will take a little bit more work to separate the skin and bones from the meat. You can carefully cut off the skin first, and then cut chunks of meat away from the bone, and toss them into the slow cooker just like that. Either way, don’t worry about cutting them up before cooking, because it’s super easy to shred those pieces after they’re cooked. Just probe around with two forks and tear up any big chunks you find, before serving.

Almost all of these ingredients can be purchased organic, or you can prepare them yourself if you prefer. Mixed veggies can be prepared with fresh produce by mixing peas, corn, chopped baby green beans, and thin chopped carrots. You can dice fresh onions. Even cream of chicken soup, cream of mushroom soup, and chicken broth can be made from scratch, if you prefer. And of course, buttermilk biscuits can be made by hand as well. I like to use shortcuts when possible, but you can make this recipe as “from scratch” as you’d like! Recipes for all of those things can be found easily online.

What I’m Into in December

december-char

December has been a month of great joy and sadness for my family. I love the holiday season, and enjoy spending special times with my extended family. We are happy to have a low-stress Christmas planned this year, with only one short trip to Orange County and the rest of our time spent locally. We also decided to go super simple on gifts this year; we bought a few toys for Cody, a few gifts for ourselves as a family, and we are giving all of our loved ones homemade cookies and eggnog. It’s going to be a long week of baking, but there was no stress about financing our gifting this year, so it’s worth it! We also have an artificial tree, and we decided not to buy any extra decorations this year. Those things have helped us to enjoy Christmas without worrying about money, which is how it should be anyway. We’re able to focus on the true meaning of Christmas, celebrating the birth of our Savior, Jesus Christ!

We are also excited about our decision to try for another baby, which we were originally planning to postpone until April. Starting in January, I will be back in training as a Christian Life Coach, in the same program I started just before becoming pregnant with Cody. I left the program because I felt too sick and tired from being pregnant and I felt that it was time to focus on the next chapter in my life, parenthood. But now, I feel ready and excited to jump back in, and figure out how to balance parenting and working as a work-at-home mom. I also will be in training to become a Hypnobabies Instructor in April, a dream I have had since using Hypnobabies with Cody’s birth. Because of these career goals, I felt that postponing another pregnancy until after my trainings were finished was best. But after a lot of soul-searching, Cory and I have decided that there is rarely a perfect time to have a baby. But we are ready for baby #2, and we don’t want to wait! That decision has brought us a lot of joy this month, and we’re eager to see our family grow.

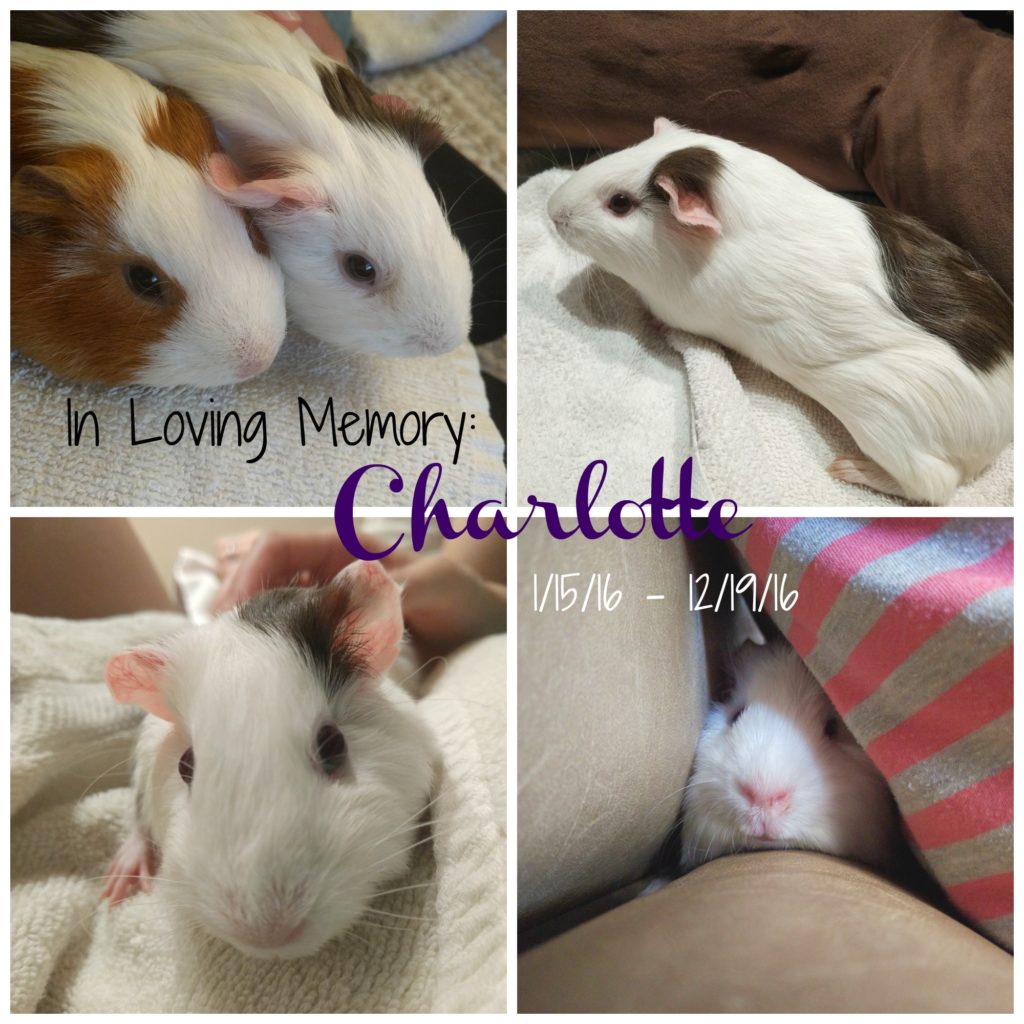
Yet this month has also included a lot of stress and sadness over our guinea pig, Charlotte. She had been sick for two months and was deteriorating rapidly over the past few weeks. After losing about a third of her body weight and not responding to three different rounds of antibiotics, along with antihistamines and hand-feeding, we knew that she was not going to recover. We chose to end her suffering and let her go peacefully to sleep. It was heartbreaking, and still is. Some people might think it’s silly to be so upset over a guinea pig, but these creatures have so much personality! She loved to be pet gently and have her back scratched, and would purr and chirp to us. She would wheek for veggies every night, and popcorn around her cage when she was excited about fresh bedding or hay. We adopted her as a 6 week old baby, and she only lived to be 11 months old. We did everything we could to help her get well, but it wasn’t enough, and that hurts my heart.

Because we saw it coming, we decided to adopt a third guinea pig to keep Charlotte’s bonded partner, Penelope, company. Guinea pigs can go through a depression that can be dangerous for their health when they are grieving the loss of a partner. Our new pig, Amelia, will hopefully help Penny have an easier adjustment period. Now that Charlotte is gone, we plan to adopt another pig because we like having a herd of three. It’s been helping me cope with Charlotte’s loss to enjoy baby Amelia, and look for another girl to add to our home. We will always miss Charlotte, but I have peace now knowing that she’s not suffering anymore, and that Penelope and Amelia will continue to live a happy life with us.

December has also brought a golden period for our puppy Lila, who had troublesome behavioral problems for many months since we adopted her back in April. Finally, at 10 months old, she has become a generally well-behaved member of our pack. It’s taken a lot of stress off of us to see that she is doing so well now.

Of course, that stress was replaced by Cody, who has really come into his terrible twos over the past couple of weeks. His tantrums, whining, sensitivity, uncooperativeness, and occasional aggression have been challenging us on a whole new level. We are learning as we go when it comes to parenting and discipline, as this is definitely testing my knowledge and ideals in these areas. As with many (if not all) parents, and especially moms, I am learning firsthand what it means to feel “mommy guilt.” I have to remind myself frequently that I’m not messing everything up or somehow ruining my child, that in fact I am doing a really good job. It’s hard to feel that way sometimes when you have a toddler who acts like a total brat–but then again, all toddlers are this way! It’s a stage of development that they all go through, and it’s not my job to control him or make him act how I want him to. It’s my job to control myself and act with integrity and respect and kindness and love, no matter what my child does. That’s one of the most important lessons I have learned so far as a parent!

Lastly, I had to let go of a short-lived dream I had to make a career out of blogging. After over a month of working hard to gain subscribers, I made absolutely no progress, and decided to go back to blogging for fun. It was disappointing, but I also feel a weight off now that I’ve let it go. I want writing to be free and fun, instead of feeling like I have to jump through hoops to run a blog business.

So that’s it! That’s my month. Here’s what I’m into right now:

What I’m Watching:

Colony – A sci-fi drama about a family struggling to live in an authoritarian state in LA, after an invasion by what I suspect are aliens. There’s a lot of mystery and a dark, thought-provoking plotline. It has one season currently available on Netflix.

Fuller House – A family sitcom created as a continuation of the 90’s show, Full House. It’s light, cute, kid-friendly comedy. It’s a Netflix original, with two seasons currently available.

Designated Survivor – A political thriller about a terrorist attack that wipes out the entire US government and leaves the presidency to the designated survivor, a member of the previous president’s cabinet. The new president, Kirkman, struggles to navigate the political waters without compromising his morals, and must sort through conspiracy theories about the origin of the attack. Episodes are released weekly on Hulu.

This Is Us – A family drama about adult triplets with various struggles, and their family of origin. I love the time jumps, plot twists, and compelling drama. This show addresses some very thought-provoking issues and can be very moving. The pilot is the best pilot episode I have ever seen, hands down. Episodes are released weekly on Hulu.


What I’m Reading:

Lady Midnight (The Dark Artifices) by Cassandra Clare

This is a book I have wanted to read for a long time, in the same universe as the Mortal Instruments series and the lesser known Infernal Devices series. This is book one of the Dark Artifices series, which will be a trilogy. I love Clare’s books and I’m excited to jump into this one. I just got it from Amazon, but have not yet had time to start reading.

Ina May’s Guide to Childbirth by Ina May Gaskin

I read this book as part of my Hypnobabies Instructor education, and it was very enlightening and reignited my passion for childbirth. It’s an amazing book and I would highly recommend it to anybody in the birth world, as well as anyone who is planning to have babies in the near future.


What I’m Cooking: (recipes coming soon!)

Chicken Dumpling Stew – oh my yum! I can’t wait to post this recipe. It’s such a good comfort food.

Mashed Potatoes – a holiday staple. My recipe involves bacon grease. Enough said.

Butter Chicken – a very tasty way to cook chicken breasts. And it’s easy!

Brown Sugar Meatloaf – although meatloaf has a bad reputation for some people, the recipe I use is seriously delectable. If I could marry this meatloaf, I probably would. 😛

Someone’s in the Kitchen…

download


When Cory and I first moved to our own place together, cooking became a hobby of mine. Growing up, my dad taught me the basics of cooking and gave me a foundation of confidence in the kitchen. Then I became responsible for feeding myself and my husband, and my interest and skills grew. Cooking for just the two of us, I enjoyed making elaborate dishes with tons of fresh ingredients, and trying new things.

When we had Cody, cooking went on the back burner (hehe, pun). We had about three months’ worth of dinners in our freezer, which I prepared before Cody’s birth, and that helped a lot. But once that food ran out, we started eating a lot of convenience foods that required minimal cooking, and we ate out often. Our food budget really started to suffer.

In the past year, we’ve finally started to find a balance between spending less time and energy, and still eating healthy and economically. One of the key components that makes my system work is my collection of recipes that are easy, quick, and that I know my family enjoys. The other key component is meal planning.

Cooking dinner at home most nights has saved us a lot of money, and allowed us to finally stay within our food budget. It’s also reignited my love for cooking. I’m again enjoying learning to cook new things,  and since I abandoned my vegetarian diet during my pregnancy, I have even more choices for cooking than I used to. I also love to experiment and make recipes my own!

One of my favorite aspects of cooking is sharing delicious food with others. While I may not be able to send food through the internet, I can share recipes. And as part of my recent blog “re-launch,” I’m going to be sharing a recipe every month! I hope you enjoy cooking some of them for yourself.

But I want to use the rest of this post to share my thoughts on the importance of meal planning. It helps us stay within our budget for food, saves time and energy, and helps us eat healthier and more balanced diets. I highly recommend it!

For us, meal planning only includes dinners. We eat the same few things for breakfast most days, and lunches are either leftovers from dinner, or things like sandwiches or bagels. Snacks are also unplanned, but we keep our kitchen stocked with our favorite healthy munchables.

Meal planning is a simple process for me. I plan out our dinners for the week on the same night every week, and make my grocery list at the same time. Some families plan out their meals for longer periods of time such as two weeks or even a month. For us, planning a week at a time works best.

My dinner planning session doesn’t usually take long, maybe 15 minutes or so. I start by looking at the calendar and taking note of nights we may need to eat a fast dinner. I write down the evening activities we have planned for each night of the week in my weekly planner, so it’s easy to visualize the entire week. I also write down my dinner list as I’m creating it, in the same planner, off to the side.

I start making my dinner list by checking out what we have in the fridge and pantry that needs to be used up soon, and plan a few meals using those things. I make a note next to the meals with time-sensitive ingredients, to make them earlier in the week. I also make a note next to meals that are fast and easy, to reserve them for busier nights of the week.

Then I look at other food we have that could be used for dinners, including frozen foods, and dry or canned foods in our pantry. Sometimes, we might have several dinners in our freezer because I make big batches of things on weekends that aren’t too busy. Finally, I choose a few meals from my “Dinner Master List,” to complete the week. Any meals that include fish or meat are designated for one of our grocery days (we have a big shopping trip on Monday, and a smaller mid-week grocery trip to pick up some favorite items from a specialty store). We also often plan to eat out one night of the week. Between all of these sources for dinner options, we can usually vary our meals quite a bit and we don’t have to repeat dinners more than once a month unless we want to.

The biggest tool in this process, other than my weekly planner, is my Dinner Master List. This is a list of all the dinners we like to eat, categorized by type of food, ease of preparing, and time required. It’s definitely one of my favorite organizational tools that I have created! I’m planning to share an editable copy of my dinner master list here on my blog soon, so stay tuned for that.

After planning my dinners for the week, I make my grocery list. I look at the recipes and double check every ingredient to make sure I don’t miss anything. I also add our regular breakfast, lunch, and snack foods onto my grocery list. Then when I go shopping, I follow my list! This is important for the money-saving aspect of meal planning. I’ve also chosen my grocery store based on their selection and prices, so that helps with the budget as well!

For the rest of the week, it’s as easy as choosing a meal from the list each night to cook. Some nights, we end up needing to change plans and we push a meal or two to the next week. It’s flexible!

There are definitely many benefits to meal planning, and I know I’d have a hard time feeding my family if I didn’t plan ahead.

Do you like to cook? What do you think about meal planning? Share your thoughts in the comments below!

My Top 10 Kitchen Essentials

In this post, I’m sharing the 10 most important, and frequently used products in my kitchen. These are all products I own and love, with the exception of two which are currently on my wishlist.

1. Nonstick cookware

Pots and pans are obviously a necessity for cooking. But what you might not think about are the reasons to choose either nonstick, stainless steel, or some other material. When my husband and I got married, we registered for a stainless steel set, which we were blessed to receive as a wedding gift. We thought that it was a good idea because stainless steel is more durable and we expected it to last forever. Well, it very well may last forever, but that doesn’t actually sound appealing since I discovered how difficult it is to cook with! Everything sticks, and you have to cook with a lot of oil and high heat to help reduce the sticking. When we switched to nonstick, I discovered how easy and wonderful it is to be able to cook potatoes and eggs and meat and anything really, all without sticking! Cleanup is super easy, too. This set in particular is really well made, looks nice, and comes with a reasonable price tag. We have the dutch oven that matches this set (but doesn’t come with it), and I plan to buy this set for my family (really myself, haha) for Christmas.

2. Silicone utensils

When you have nonstick cookware, you want to avoid metal cooking utensils. This set of silicone utensils are my favorite to use. That spatula spoon is the best! And the ladle is so much easier to use than a hard plastic one because you can really “scrape” the bottom of the pot and scoop up whatever you’re ladling. This set is a great price for five utensils, and it comes in red, gray, or teal.

3. A thin turner

The only thing I don’t like about silicone utensils is that they are chunky. The spatula is good for flipping things in the oven or flipping meat, but it’s really too thick to handle pancakes well. That’s why I bought this, and it works perfectly for flipping more fragile foods.

4. A good knife set

We have this set, minus the smaller santoku knife, which didn’t come with our set (purchased elsewhere, before I discovered the joy of Amazon.) These knives are sharp, durable, look nice, and come with a knife block for storage. We hand wash ours rather than tossing them in the dishwasher, and as a result they have held up very well. I don’t see us needing to replace them for many years, if ever.

5. Measuring cups

These measuring cups are great because they have little magnets in the handles which keep them together and organized in the drawer. They’re metal, meaning more durable than plastic, and they have the measurement markings etched into the handles. I bought these to replace my plastic measuring cups when the ink smudged away after a couple of years going through the dishwasher. These have held up much better.

6. Measuring spoons

And of course, if you want your measuring spoons to match your measuring cups, then you should get these too! Did I mention how cool those magnets are? My measuring spoons are always neatly stacked in the drawer, and it takes almost no effort to keep them that way. It makes it easier to find exactly the spoon I need without digging around.

7. Measuring cups

These glass measuring cups are awesome for when you need to measure larger amounts of things, or when you’re measuring liquids and you don’t want to spill. I use the largest one for making pancakes, and it’s super easy to pour the batter onto the griddle with the built in spout. The smallest one comes in handy for making buttermilk, to add to the pancakes, too. (I do cook things other than pancakes, by the way, even though this post is oddly pancake-centered.)

8. Cutting boards

I currently have a mismatched set of cutting boards, two of which are on their last legs. I’d really like to replace them with these! While bamboo was appealing to me when I was first starting out building my own kitchen tool set, I have now learned that plastic is preferable. Bamboo doesn’t hold up in the dishwasher very well, and it can’t be sanitized as thoroughly as plastic. On the other hand, a cutting board made of cheap plastic isn’t going to hold up very well either. These ones have great reviews, so I’m hoping they’re durable and well-made. I also highly recommend a set of cutting boards with nonslip feet (like these), because it can be difficult to cut on a board that’s slipping around the counter!

9. Rice cooker

I have no idea why it took me so long to buy a rice cooker. For years I struggled to make the perfect rice in a pot. Why, oh why? Rice cookers are awesome, and this one does its job well and has a great price. I use mine about once a week! If you take a minute to get your rice started earlier in the day, it saves time when you need to cook dinner. This one has a “keep warm” function, so I can make the rice hours ahead of time. It’s also nonstick, which makes it ridiculously easy to clean.

10. Food thermometer

If you cook meat, then investing in a food thermometer is a must (and it’s really not much of an investment)! Checking that your meat is cooked to the proper temperature prevents food poisoning, and it’s quick and easy to do. I always check my meat, ever since the Westropp hamburger fiasco of 2014. (What, you haven’t heard of this historical event? How strange.) Seriously though, a food thermometer is a must. It’s also important for making yogurt at home, if that’s something you’re interested in.

So there you have it! I’ve given you a glimpse into my kitchen, and the tools I use most.
What about you? What are your favorite kitchen essentials?

Recipe of the Month – Chicken Coconut Curry

Welcome to my new recipe of the month! This is a new idea I’m trying, to share my love of cooking with the world. I hope you enjoy the recipes I post here, which are designed to be reasonably easy, quick, nutritionally balanced, and of course, delicious. If you try a recipe out, please leave comments on the post with your experience. I’d love to know how it worked out for you!

This recipe is for a tasty, easy dish that my family enjoys. We aren’t huge fans of Indian food, but we don’t hate it either. I think this meal would be enjoyed by lovers of Indian food and picky eaters alike, because it’s mild while still being flavorful.

Servings: 2 (double the recipe for more servings!)
Total Time: 30 minutes

Ingredients:
Chicken breast, 1 large or 2 medium
1 carrot
1 small bunch spring onions
3 tbsp curry paste
About ⅓ cup coconut milk (more for a creamier dish, less for a stronger curry flavor)
1 cup rice, uncooked
½ cup peas, fresh or frozen
Olive oil
Salt and pepper to taste
Fresh cilantro leaves, if desired

Notes:
I sometimes like to prep for the meals I plan to cook in the week, on the day I go grocery shopping if possible. Getting all of the chopping, marinating, and slow cooking processes (like steaming rice) out of the way all at once makes it super quick and easy to cook dinner every night.

The curry paste I use is found in my grocery store in the aisle with Asian foods, which is also where the coconut milk is. Curry paste can be found in varying degrees of spiciness and with different flavors added, too. I use mild, which has plenty of flavor for my family. The coconut milk I use for cooking comes in a small can, and is very creamy and delicious. This recipe doesn’t use the whole can, and the leftover can be saved and used for other recipes.

img_20161104_185907


I always take the temperature of meats when I’m cooking, because things like color, juices, or even the amount of time cooking aren’t always accurate or consistent ways of knowing when the meat is done. All it took was one case of food poisoning to convince us to adopt this practice! Food thermometers are not expensive, and it only takes a minute to check. You can download a free printable document with safe cooking temperatures for different types of meat here! It also has information on safe food handling practices in general.

Prep:
Cook the rice.
Cut the chicken breast into bite-size pieces.
Wash and cut the ends off of the carrot, then slice it into thin slices.
Wash and cut the ends from the top and bottom of the spring onion, then cut the green stalks into thin slices, and roughly dice the bulb part.

Cooking:
In a large pan, heat about a tablespoon of olive oil. Season the chicken with salt and pepper, then add it to the pan. Dump in the carrots and onion as well. Stir, cover, and cook for 2-3 minutes. Stir again, and cover. Covering the pan helps the food cook faster and the veggies become more tender.

img_20161104_190147


Add the curry paste and coconut milk* to the pan and stir it well to combine. Lower the heat, cover, and let it simmer for another few minutes.

*Coconut milk separates naturally, so if you’re not using an entire can, be sure to stir it first before measuring or scooping out the amount you’re going to use!

img_20161104_190831


(Indian food isn’t exactly photogenic, now is it? But I promise it tastes good!)


Meanwhile, heat the peas, then add the rice, stir, and heat until it’s all nice and warm.

img_20161104_191616


Check the temperature of the chicken with a food thermometer, to ensure it has reached at least 165 degrees Fahrenheit. Serve the rice with peas next to the chicken curry, and top with fresh, (washed), torn cilantro leaves, if so desired.

img_20161104_192525

Enjoy your dinner!